HOW TO BUY & VIEW YOUR NFTS
Buying an NFT
1. Buying an NFT from a store is the same as purchasing any other product on Shopify. Click “Add to cart” or “Buy it now” and go through the payment process to purchase the NFT.
2. Once the NFT is ready to be minted, you will receive instructions from no-reply@shopify.multibaas.app similar to the one below with instructions on how to mint their NFT.

3. After clicking the link, please enter your email that was used to purchase the NFT and agree to NFTeapot’s Terms of Service.

4. After signing in, you can see all the key information about the NFT, as well as a button to connect a web 3.0 wallet. In this case we will be connecting a MetaMask wallet and we recommend using a desktop browser. For instructions on how to install MetaMask please visit https://www.curvegrid.com/docs/setting-up-metamask-desktop Once installed, click Connect Wallet and then Connect in the popup.


5. After your wallet is connected, you can now receive your newly purchased NFT! Click “Claim my NFT”.

6. You will be asked to sign a signature request from MetaMask to begin the minting process. Click “Sign” to begin the minting. Please note that it may take some time for the NFT to be created and delivered into your wallet. You do not need to keep the mint window open


7. Once minting has finished, you will receive a confirmation email.

Buying an NFT (Mobile)
1. Buying an NFT from a store is the same as purchasing any other product on Shopify. Click “Add to cart” or “Buy it now” and go through the payment process to purchase the NFT.
2. Once the NFT is ready to be minted, you will receive instructions from no-reply@shopify.multibaas.app similar to the one below with instructions on how to mint their NFT.

3. Take the URL that was given to you in the email and copy it. Then navigate to the MetaMask App. Click on the menu on the top left.

4. Click on the browser button option. Paste the URL you copied from the email into the “Search or Type URL” field and click “Go”.


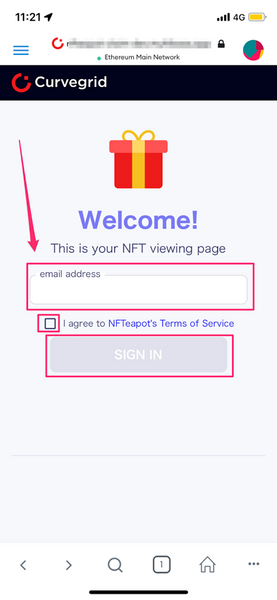
5. Enter your email address and agree to NFTeapot’s Terms of Service.
6. Click on “connect wallet”. A popup will appear inside the app, click on “connect”.


7. You will be asked to sign a signature request from MetaMask to begin the minting process. Click “Sign” to begin the minting. Please note that it may take some time for the NFT to be created and delivered into your wallet. You do not need to wait or refresh the app until it appears.


8. Once minting has finished, you will receive a confirmation email.

Viewing your NFT on OpenSea
Once your NFT has been bought and claimed to your account, you are now able to view it on OpenSea.
1. Navigate to the https://opensea.io/ and click on the profile button top right.

2. Connect your wallet by clicking on the MetaMask wallet option.

3. A MetaMask notification will popup and ask permission to connect with MetaMask. Click “Next” and “Connect”.


4. Once logged in, you will be greeted with your profile page on OpenSea. Click the “Hidden” tab.

5. The NFT you have purchased will be shown. Click on the three dots in the bottom left of the NFT card.

6. Select “Unhide”, and click the “Unhide” button at the bottom right of the screen.


7. A signature request will popup. Click “Sign”.

8. After the signature has been signed, your NFT will now show under the collected tab.
Copyright 2022 © Curvegrid
Adding an NFT in MetaMask (Mobile)
NFTs can be added to the mobile MetaMask app.
1. Open MetaMask and enter add the Polygon network to allow your NFT to appear in your wallet
2. Click on the three horizontal lines in the upper right hand corner, click “Settings”, then “Networks” to add the Polygon network to your MetaMask


3. Click “Add Network” and enter the following information to enable the Polygon network.
• Network Name: Polygon Mainnet
• RPC Url: https://rpc-mainnet.maticvigil.com/
• Chain ID: 137
• Symbol: MATIC
• Block Explorer URL: https://polygonscan.com

4. Go back to the homescreen of MetaMask mobile and ensure that the Polygon network is enabled once adding it. Click on whatever network is displayed below “Wallet”. From here, scroll down to find Polygon and make sure it is selected.


5. Go to MetaMask home screen and make sure that the “NFT” tab is selected. Click on “Import NFTs”.

6. After everything is enabled, you will be able to add your NFT to your MetaMask mobile after revisiting the link received from the email sent by Curvegrid after purchasing the initial NFT.
Locate the email and click “here”. This will relocate you to Polygonscan where you need to note the contract address and tokenID. This information will allow your NFT to appear in your MetaMask mobile wallet.


7. Enter the contract address and tokenID and click “IMPORT”.
For this example: Contract address:
0x75472cda50d383492fleed22d6e35ff5ee5e4712 TokenID: 85
8. After following these steps the NFT should be displayed under the “NFTs” tab of your MetaMask mobile.

Copyright 2022 © Curvegrid
Setting up MetaMask (Desktop)
This guide will help you to set up your very own MetaMask wallet. Having a web3 wallet is an important part of owning and storing your NFTs, tokens, and other web3 items.

Getting started
1. The first step is to download and install MetaMask on your device. Please navigate to the MetaMask website - https://metamask.io/.

2. MetaMask has a variety of options to install:
Browser extension: Google Chrome, Brave, Firefox, Edge
Android: Phones that are running android
iOS devices: Any compatible iPhones

In this guide, we will be using the Google Chrome browser extension.
Click on “Download now”, select “Chrome” and install MetaMask to Chrome.
You’ll then be taken to the chrome extension site to install the extension.

3. After MetaMask has been installed, a new tab will open. Click “Get Started”

4. We will be making a new wallet. So click “Create a Wallet”. Next agree to any terms and conditions.

5. Next, you will be asked to create a new password (8 characters minimum). Review the Terms of Use and agree. When you’re happy with your password and have read the terms, click “Create”.

6. Please watch the short video on the MetaMask Secret Recovery Phrase as it explains what it is and how it works.

7. Your personal Secret Recovery Phrase will then be generated and is specific to your account, keep it safe! Click to reveal and store it.

8. Quiz time! You will then be asked to confirm your Secret Recovery Phrase. Select each word in the correct order to make sure you have it down correctly.

9. Congratulations! You’ve made your first MetaMask wallet. A new tab will open showing your account.

We recommend pinning the MetaMask extension next to your address bar shown below to access your MetaMask with ease.

When you would like to access your MetaMask wallet again, just click on the fox logo on top right of your browser and that’s it!

Copyright 2022 © Curvegrid
